Pages

Monday, February 20, 2023

Hanging Baskets

 I found the easiest way to make hanging baskets!  And even better, they look fabulous!  It only takes three things.  Small floral bouquets, floral clay and an egg carton.

YOu want to start with the egg carton .  THe part that you will be using and wanting is the section that goes up into a point between the eggs.  


YOu  will be cutting that end off.  It will create a small little pot/bucket shape.  These are the actual flower pots


Simply take a brown sharpie and color it brown.  (or whatever color you want.


Get some floral bouquets.  Search for the ones with the smallest of flowers.


Cut the flowers off of the bouquet, leaving a stem on them.


Take a small amount of floral clay and press it into your flower pots.  


Insert a variety of your small cut flowers into the floral clay, arranging the flowers to suit your tastes and needs.


Insert three pieces of embroidery floss through the tops of the flower pots and bring them up to form a tripod shape.   Hang them from the porch roof.


I told you this was easy?    I think they look fabulous also!!!!

Monday, February 13, 2023

Look how far I've come

 I sometimes get discouraged.  I want my miniature scenes to be picture perfect.  I get upset though because my skill level is not perfect.   I'm a perfectionist that can't reach perfection!  How annoying is that?


Just recently, I was sitting back and creating books for the Library in the 1920's era house.   I was being my giddy self because while I saw the issues, I was really liking my new books.  And that is when I realized how far I have come from those first creations!   We will use the books as an example of how my skill has progressed!

When I was creating the Mini Mansion Dollhouse, I created a bookshelf for under the steps. Naturally, I needed books to fill my bookshelf.  So I thought about it.  I did a little research and I set about making books.  I was so tickled with my books.  I absolutely loved them!


I actually posted about my awesome books and included a mini tutorial in a post way back in 2016. 


When I decided to start the library in the 1920's era house, I knew I needed books.  So I researched again because silly me forgot that I had a mini tutorial.  I started to make books out of magazines.


I was in love!  They looked so much better than the original ones.  Actually lifelike....or at least closer!


I kept working and making books because I had a full library to fill.  I made some books out of foam board.  I made some books out of wood.  I was a book making machine. 

And eventually, my library was ready to be filled with books.  I was so tickled with the outcome.  But you know what?  Those original books, they did NOT make it to the shelves!  I didn't have the heart to throw them out though.  I put them back in my boxes of extra stuff because when I feel discouraged about something not being perfect, I can look at those books and say, "Give it time Maryfran, progress comes with time"

Monday, February 6, 2023

The Library

It's been a long process!  I got the large dollhouse that I have planned to do in the era of 1920's years ago!  I actually wrote about it in March of 2021!  I had purchased it months before that!    

My work on this dollhouse came and went almost as if with the passing winds.  I worked on the outside and then paused.  I decided to create a library in the one room.  I worked on the floor and then I paused.  I worked on the paneled walls.  And then I paused.    I even made books for the library.  But then I paused again!  And when I say paused, I mean PAUSED.  Paused for months at a time!  But that's ok!  I eventually get back to it!  And that is exactly what I did at the end of 2022.    


I finished my entry into the Creatin' Contest at the end of November.   I continued to ignore the 1920's era dollhouse and instead dove into my miniature memory boxes.   I eventually did turn to that library.  

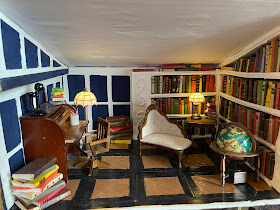
I began by creating the bookshelves.  I made the shelves out of foam board.  I added a swirl of yarn for decorative purposes and then painted the whole thing white.  


After I made the bookshelves, I realized that what I thought was a huge pile of books that I had made agest ago was not that big afterall!   I had to make more books.  And then I had to make some more!  I made books until I felt them oozing from my pores!

Finally I had enough books to fill the shevles!


Finally, it was time to put it all together!   I Placed the shelves and then started playing with the furniture.  I used a rolltop desk, phone, a side table and a chair that I had found at antique stores over the years.  The lamps, are battery powered and I purchased them here and here from Amazon.    The cookies and the mug were swap items I received.  Everything else was made by myself.


Link to youtube Video: