I moved the steps in the mini mansion and loved it. The only thing I didn't like was the space under the steps. Finally I decided on building a bookshelf for under the steps.
I was nervous about it for sure! But then I kept reading about people using foam board for building and decided to give it a whirl. I am sooooo glad that I did!!!
I traced the space and cut a piece the shape of the under steps space. It cut like butter with my exacto knife! I dry fitted the shape and it fit perfectly. I would like to say that I worked off of a pattern but I didn't. I knew a book would be about 9-10 inches tall...so I figured my shelves should have around a one inch (one foot ) opening. I literally just cut and thought about each step and before I knew it I had a bookshelf that fit into the space perfectly!

I was charmed! I was in love!!!
I am still leaning to no rail/banister on the steps as the room is so small. But I knew I needed/wanted a rail around the steps on the second floor. So I started that. The pieces I have were too big so off to the workshop I went.

Oops!!! I learned to take it very slow!!!

And I pieced the rails together (yeah I probably should have painted first! And you can see how much I cut off in the picture!!

So the railing, steps and bookshelves need a nice coat of white paint and they will be ready for installation and books.
BOOKS!!! I need books!!!
My supplies:
File folders (card stock)
White paper
Colored pencils
Glue
Scissors
List of books (printed and shrunk as far as will fit on books)
I knew the rough size of a book to be about 3/4 of an inch so I cut a long strip of 3/4 inch wide cars stock.

I then cut the long strip into the width of the cover of the book. Honestly I eyeballed it....but it is about 1.5 inches. (And further down the assembly line I used a previous cut book cover as my template). I also marked the rough spots to fold the cover.

I colored the cover. Since my house is set in the 1900's I didn't want fancy pictures....

I then folded the cover into a book shape.
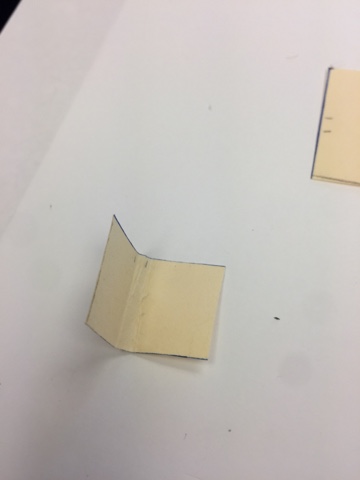
I took the white paper and cut it in long strips (the width of a piece of paper) in 3/4 inch strips.

This strip of white paper I folded into an accordion shape. Once again I eyeballed it and checked to make sure it would fit into the cover of the book I was working without overlapping. I trimmed the top and bottom of the 'accordion' to make it nice and neat.

I then glued the inside binding of the cover and attached one of the 'accordion' pieces of paper. I held this with my fingers for a few seconds.

My first few attempts I wrote with a find pen the name of the book...and while it was cute I didn't like it.

I decided to print up the names....so at this point I then took my printed list and cut one title out.

I colored it the same color as the cover and glued it to the outside of the binding. Center and hold for a few seconds to make sure it adheres.

Set to dry and begin the next book!!!

Notes:
I chose titles that were historically accurate.
The chairs will be reupholstered soon
The wallpaper is destined to go bye bye soon too!!
No comments:
Post a Comment