Showing posts with label log cabin. Show all posts

Monday, January 9, 2017

Slow progress

I have not forgotten the dollhouses!  Life has just been busy and well...the houses are at points that the work is sloooooooow!

I did fix the wallpaper in the mini mansion...the wallpaper that I messed up when I installed the trim!!!  It looks pretty good  although a careful eye would pick up the repair.   But, I'm satisfied with it.

At a historical museum a few weeks back I saw a roasting oven that was used in open heart cooking.  I was enthralled and decided that my log cabin MUST have one!!!i thought about it..and actually experimented with a tin foil pan but I didn't like that at all. So I changed my material and tried it again....the cardboard/matte board was excellent!   I am very happy with it.  Especially since I painted it!!!!   I will need to get out the polymer clay and make a 'bird'  to have inside the roaster in the spit!  But until then I'm happy (with the back of the toaster toward the fireplace you can't see it anyway...but I know that there is no birdy in there!!!!

I have been contemplating the kitchen of the McKinley.   I knew that I wanted to go between the 20's and 50's for the kitchen...so I started researching...these pictures are inspiration for me!!!!


I also decided that I made a mistake on something with the McKinley.   What was the mistake?  Well since I'm planning on installing lights into the McKinley I wasn't too worried about prepainting and papering the house before installing it.  Yeah I was sitting there looking at these windows....and doors and all that trim and I decided that I should have painted the trim before installation.   No problem....I  decided to paint the inside window trim before the next step.   I was careful around the windows for sure...but I wasn't too worried about getting paint on the walls of the rooms...they will be papered over eventually!!!

We went antiquing this week...it was so cold that antiquing was a good option!!!   Of course we looked at lanterns!!!

But I got lucky and found two dealers that had dollhouse stuff that I liked!  I picked up an adorable ceramic/porcelain bathroom set for $5!  I also picked up a new gas/cookstove that I love but sadly is too big for the mini mansion I will just stay with the old fashioned coal stove.  I also got a towel rack, same cabinets and some neat little things like brass pots and pans, a brass towel rack,  a neato old phone, toaster and just fun stuff!!! I also got the cutest little sink....cute enough thatbibhave pondered putting a false wall upstairs in the mini mansion and adding a small bathroom....you would only see the sink..  I haven't ruled that out totally yet...but I am leaning toward no.. I have no running water in the kitchen so it would be kinda weird to have a bathroom with running water.

I got home from my weekend of adventuring and found a box!   My lights have arrived!  


So today I am reading up on installation of said lights....


I'm terrified Of this wiring process but I am soooo excited to see my wee little baby lit up!!

Wednesday, December 28, 2016

Addiction

Work is steadily progressing....on everything!!!  I usually spend an hour or two in the evenings working on my 'dollhouses'.  It is so relaxing and satisfying to see things come to life!


First of all let me include a picture of the rope bed that I FINALLY finished!


And beside the rope bed is the cradle with the wee itty bitty afghan that I crocheted with embroidery floss.


Yes I have sheets and a quilt for the bed but it's too darn cute to not show off the rope part!!


With those two things done I haven't done much else on the log cabin...other than think about little things that I want to do.  I still want to put in a fireplace crane or a gridiron at the fireplace. 


And I want to have some dough being rolled out with the rolling pin....little things like that!). 


Work has been moving along on the mini mansion.  The living room received its floor and then commenced the slow polyeurthane...dry... sand....clean..polyeurthabe...sand..dry...clean...repetition!  As soon as I was happy with the 'waxed floor look' I finished up the living room with the trim and other than the lighting (I am working on a budget, the fixtures are going to have to wait a few weeks/months!). The room was/ready for furniture.

It will need all the fun little touches...stuff like a foot stool...a knitting basket....pictures...etc.  but it's fun to see it look 'kinda real.'


Speaking of pictures...this dollhouse was my boyfriend's sister's when she was a child.  I found some of her artwork on the walls.  I kept one (I wish I would have kept them all but I wasn't thinking until it was too late).   This morning I made a wee little frame.....

and painted the frame gold!   


Well, the curtain rods I made are gold...which were not hung yet in the previous picture!).  


So next up was the kitchen....I decided on green walls with a white wainscoting, a white tin style ceiling, and the same light pine flooring.  The walls were covered and the floor was laid tonight.  Lots of clamps and weights!!


Once again I was at a standstill....


So on to the McKinley!!!


After being overwhelmed the other night I knew I had to tackle it.  Otherwise it would gain big ugly horns and I would never do it!  So the next morning I started pulling out the pieces for the first steps.   


It was just time consuming...flipping through the large awkward panels and getting parts without the other pieces popping free from the panels.


   So I gave up...and went and purchased a whole raft of ziplock bags.  I spent a few hours labeling all of the pieces and bagging them in ziplock bags according to the panel number from which they came.   Much more manageable!!!


Tonight the real work began!!!   Window and window trim!!!!!  


All of the windows have their outside trim!!!


My workspace is way too small!!!  


I think I need to finish the mini mansion....at least the walls, floors and ceilings so I can rest those baby back on the piano while I dream and plot about the furniture for upstairs and the little fun things that make it seem real!  


Then I'll be focused on stuff like...

Spice boxes


And rug beaters


But the addiction grows!   I finished my work tonight and picked up the flyer that was in the box that my dollhouse came in and I think I know my next dollhouse...it will be a quickie though!!!!  


The Storybook cottage by greenleaf.   


Why that?  I've always said I wanted to do a quilt shop!  Wouldn't that make the cutest quilt shop!!!!  (The Coventry cottage would work too...but the smaller one is the think I'm going to go with...when that day comes!!)


Wednesday, December 21, 2016

Jack of all trades

I had always wanted to work on dollhouses.  I remember when I was young...like earlier than 10 years old and going to a hobby shop (they sold model trains so we went frequently for my brother).  This hobby shop sold amazing (ok to a 10 year old maybe) dollhouse furniture and accouterments!  I know that as a kid I drooled and I know that as a kid, what was sold there was not 'toys' and therefore I didn't get more than a single piece or two from that store.


For years as an adult I dreamt about what I wanted to do with the log cabin that I was given as a child.  I never took more than the first preliminary steps to start....


In the meantime I was hopping from one craft to the next.   Literally!!  I would work on quilting and be hung ho on that.   Then I would get bored and decide that crochet was my thing.  I would crochet like a crazy women until I got bored.  Then....counted cross stitch!!!!  Yes I love counted cross stitch, count me in!   But yeah, that bored me after a bit too.   Scrap booking?  Yup..been there done that.  Rug hooking?  Absolutely!  Painting?  Yeah I dabbled!  Cake decorating?  Uh hu!!!   You name it, I have probably tried it!   (I should work at a craft store...I've dabbled in almost everything!). Jack of all trades, master of none!!!   Eventually in my travel through the circuit of all things craft I would make my way back to quilts...or back to cross stitch...or sewing...or whatever.  Until the wild hair struck and I was off on the next thing.  I cycled through crafts!


So last year when I actually got serious about dollhousing (Is that a word???  I like it as verb.) it came as no surprise to anyone.   What comes as a surprise to me is how well it is adaptable to someone like me that had had extensive 'training' in all manner of crafts.  I'm not a master at anything but I'm proficient  enough at a Lot of things to be able to work on my dollhouses!  My jumping from craft to craft taught my invaluable skills for dollhousing! 


Furthermore dollhousing is perfect because I can change direction and never get bored!


For example.....My last 24-48 hours?


I made bookshelves and worked on the railings....woodworking


I made books...paper crafting


Today I reupholstered chairs....


The red is the old one the gray the new!

Worked on a quilt for the log cabin rope bed and trundle bed.....


Stained the rope bed and trundle bed


Painted the mini mansion


Before...


After...with one coat of paint...


I also started fiddling with concepts to make a front door (there is none) and worked on crocheting a wee tiny Afghan!  


Wow...talk about going from one craft to another!   And guess what??  I love it!!!!


Tuesday, October 18, 2016

Baskets

Other than then bed which needs quite a bit more work I am working on little things in the dollhouse.   I am filling the attic with stored goods and little touches that bring it to life!

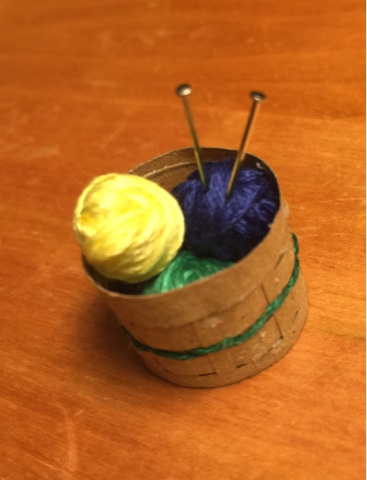
Today I decided to take a roll of craft paper and make baskets.


I only needed craft paper, scissors, glue small wooden circles and I added some embroidery floss on occasion to add color.


First I cut a strip of craft paper big enough to go around the wooden circle..with a bit of overlap.  The height is whatever you want!  I made taller ones and shorter ones.  

I then cut it into the 'comb'. The first few I actually drew the comb in the paper first.


 But after the first few baskets I honestly eyeballed my cuts trying to keep them uniform and as small as possible.


Then I cut strips of the craft paper ...once again as thin as I could....however I did use a ruler for these!  Even and straight is important here!   The strips need to be just a bit longer than the 'comb'.

The 'comb' is the base of the basket and what I weaved all the strips through.

Take one strip of paper and weave it in and out and push it to the bottom of the comb.  It works best to dab a bit of glue on the paper to hold the paper on each end.   I also found that with working with the smaller baskets and on the top row of any basket's weave that if I glue ever other weave...just a tiny smear of glue ....it worked much better!     

Weave strips in until you reach the top. 

When the weaving is done take another strip and overlay it over the top edge....


Take a wooden circle base (or heavy Matte board or card stock paper) ...Place glue on the edge of the circle and glue the bottom inside of the basket weave to the circle....so that the circle is the base.

At that point you can be done if you want.  

If you want a handle grab another strip and glue one end inside the basket...and glue the other side on the inside of the opposite side of the basket....it is again totally subjective to style and preference as to how long the handle is!


I started to get fancy.  On one or two baskets I glued a strip of colored embroidery floss around the top and bottom edges of the basket.

I also weaved some embroidery floss into the basket between strips of paper weave.


I decided that such a basket would have handled to match so I braided some embroidery floss together.... (I used the same color as the accent weave)


I did that twice...then I made little loops from the braids and glued two loops to the inside of the basket.


So many variables...each one is different and has its own personality!!!


Now I just need to figure out what to put in my baskets!!!  Eggs?  'Yarn' and needles?  Laundry???

First up...yarn and 'knitting needles'. 


 What does the bed need???  It needs stained, roped, mattresses created , pillows and quilts for both the main bed and the trundle bed

Thursday, September 15, 2016

Log Cabin: Getting close now!!

I have been working on and off on the log cabin dollhouse.  It has been a headache in some ways because this house was definitely NOT made to any scale!!!!  So nothing fits perfectly!   But that same non-scale dilemma has allowed me the freedom to fudge quite a few things!!  So a mixed blessing!

I have made the rope bed and matching trundle bed.    It needs sanded and stained/painted.  I am also currently working on the warm and toasty quilts for the bed.   The quilts are slow going as I have been cross stitching them.  Of course I started with quilt for the biggest bed...it is sloooow going!  Hopefully the trundle bed and cradle quilts will be quick to complete!!!  
Yes the fabric will soften up after washed.  

I have also recently decided that I need a work table in the kitchen...mostly because I found a cute rolling pin that I am dying to use!    

Other than those 'big projects'. The log cabin is mostly done....just little small touches to make it look totally livable!

What touches?    

**A mouse and a mouse trap (I had been looking and just found one at an antique store this week!!)
** a chamber pot 
** wash basin and pitcher (oh I guess that means I need a stand for that too.
** a few kitchen things for the work table 
** lanterns, lamps and candles 
** I need to weather the wash board!!!


This dollhouse isn't even done and I've started buying pieces for my next dollhouse AND for a room that I want to do!!!  Plus I have visions of a shop or two that I want to do!

What dollhouse next??? 1940's-1950's era.  I found awesome vintage kitchen appliances at a fair recently!!

What room???  A Christmas scene from the turn of the century...but a well to do house..not a log cabin!!!  I have the furniture I just need to reupholster!  

What shops?    A quilting/fabric store and a quilt shop selling quilts!  I have nothing...yet.  

Oh yeah this is addictive!!!!


Wednesday, December 2, 2015

Log Cabin: Braided Rugs

Those hardwood floors in my miniature dollhouse cabin seemed rather cold and stark.  I decided that I needed some braided rugs.  I had the perfect solution to procuring them too!

I gathered my supplies:

Scissors
Wax paper
Glue
Yarn (I used the cotton candy yarn that many crafters use for making wash clothes and dishrags....it's less fuzzy and thus would be perfect for a dollhouse)

I laid wax paper out on my work area and then spread my craft glue in a circle.   Starting at roughly the center, I curled up the yarn and started to wind it around in a circle on the glue. I simply made sure that each round of yarn was pressed tightly to the proceeding round.  I went around until I reached the desired size.
I 
I allowed my rugs to dry overnight and then I cut the excess wax paper off and voila.....instant braided rugs.


And the finished project!!!!

And pardon the dollhouse...the remodel is not quite complete.  (the fireplace needs finished and some painting touched up!)