Monday, December 26, 2016

Overwhelmed

Wow...I am so overwhelmed right now I can't even think straight!!!


First of all let me say that all major construction on the mini mansion has been completed.   She is fully painted and she has a nice brick foundation and a nice brick front porch!   The outside simply needs the chimney attached (way down the line) and some flower put in the window box!    


The inside is coming along nicely.  The living room is wall papered, the ceiling is covered and I have laid hardwood floors.  The living room floor has received their first coat of polyurethane to make them a little glossy.  I have cut the trim for the room (both floorboards and cornice!) and have that all painted a nice crisp white.   Why yes...I'm rocking the living room!!!


I'v sat and stared into the kitchen trying to come up with a plan for that room.  I know that the three main pieces of 'furniture' in that room will be a table and chairs (just two chairs). A cabinet and a cookstove.     I found some wallpaper that I liked but it just seems a bit too fancy for my purposes.  I do like the idea of a wainscoting!!!   But really?   What color scheme?   What floors?  Hardwood to carry it through?   Tile in a 1900 turn of the century house???  Decisions decisions!


So after I stared a while and came up with no answer...I turned my attention to.......(drum roll please)....the McKinley!!!!   

I have been putting off the McKinley because I wanted to have the log cabin completed (well mostly, is any dollhouse really ever completed).   I finished that with the rope bed being done.  And I wanted to have the major construction and remodeling work done on the mini mansion.   Check and check!!

Yes I didn't just look.  I cracked the box!!!


Immediately fear welled up within me!!!   How was I to do this?????


I read the first page and I knew that I wasn't the first person to feel overwhelmed when I saw this!  


I read the instructions started pulling aside the panels that I would need to start!   Apparently I start on Windows! 


It was getting late and I need a few things.....so I sat everything aside and went to bed!


They recommend hot glue gun as my adhesive...but I read somewhere that hot glue guns are no longer the way to go...so I'm wondering if I shouldn't do the secondary method that they gave....wood glue?   I would just need to clamp and secure everything for drying.....so either way I need a hot glue gun or some clamps and tape (they actually said masking tape works well!)


I think it's going to take me a long time to build this!!!


Wednesday, December 21, 2016

Jack of all trades

I had always wanted to work on dollhouses.  I remember when I was young...like earlier than 10 years old and going to a hobby shop (they sold model trains so we went frequently for my brother).  This hobby shop sold amazing (ok to a 10 year old maybe) dollhouse furniture and accouterments!  I know that as a kid I drooled and I know that as a kid, what was sold there was not 'toys' and therefore I didn't get more than a single piece or two from that store.


For years as an adult I dreamt about what I wanted to do with the log cabin that I was given as a child.  I never took more than the first preliminary steps to start....


In the meantime I was hopping from one craft to the next.   Literally!!  I would work on quilting and be hung ho on that.   Then I would get bored and decide that crochet was my thing.  I would crochet like a crazy women until I got bored.  Then....counted cross stitch!!!!  Yes I love counted cross stitch, count me in!   But yeah, that bored me after a bit too.   Scrap booking?  Yup..been there done that.  Rug hooking?  Absolutely!  Painting?  Yeah I dabbled!  Cake decorating?  Uh hu!!!   You name it, I have probably tried it!   (I should work at a craft store...I've dabbled in almost everything!). Jack of all trades, master of none!!!   Eventually in my travel through the circuit of all things craft I would make my way back to quilts...or back to cross stitch...or sewing...or whatever.  Until the wild hair struck and I was off on the next thing.  I cycled through crafts!


So last year when I actually got serious about dollhousing (Is that a word???  I like it as verb.) it came as no surprise to anyone.   What comes as a surprise to me is how well it is adaptable to someone like me that had had extensive 'training' in all manner of crafts.  I'm not a master at anything but I'm proficient  enough at a Lot of things to be able to work on my dollhouses!  My jumping from craft to craft taught my invaluable skills for dollhousing! 


Furthermore dollhousing is perfect because I can change direction and never get bored!


For example.....My last 24-48 hours?


I made bookshelves and worked on the railings....woodworking


I made books...paper crafting


Today I reupholstered chairs....


The red is the old one the gray the new!

Worked on a quilt for the log cabin rope bed and trundle bed.....


Stained the rope bed and trundle bed


Painted the mini mansion


Before...


After...with one coat of paint...


I also started fiddling with concepts to make a front door (there is none) and worked on crocheting a wee tiny Afghan!  


Wow...talk about going from one craft to another!   And guess what??  I love it!!!!


Tuesday, December 20, 2016

Books books books!

I moved the steps in the mini mansion and loved it.  The only thing I didn't like was the space under the steps.  Finally I decided on building a bookshelf for under the steps.   


I was nervous about it for sure!  But then I kept reading about people using foam board for building and decided to give it a whirl.  I am sooooo glad that I did!!!


I traced the space and cut a piece the shape of the under steps space.  It cut like butter with my exacto knife!  I dry fitted the shape and it fit perfectly.    I would like to say that I worked off of a pattern but I didn't.  I  knew a book would be about 9-10 inches tall...so I figured my shelves should have around a one inch (one foot ) opening.  I literally just cut and thought about each step and before I knew it I had a bookshelf that fit into the space perfectly!


I was charmed!  I was in love!!!


I am still leaning to no rail/banister on the steps as the room is so small.  But I knew I needed/wanted a rail around the steps  on the second floor.  So I started that.  The pieces I have were too big so off to the workshop I went.


Oops!!! I learned to take it very slow!!!


And I pieced the rails together (yeah I probably should have painted first!   And you can see how much I cut off in the picture!!


So the railing, steps and bookshelves need a nice coat of white paint and they will be ready for installation and books.


BOOKS!!!  I need books!!!


My supplies:

File folders (card stock)

White paper

Colored pencils

Glue

Scissors 

List of books (printed and shrunk as far as will fit on books)


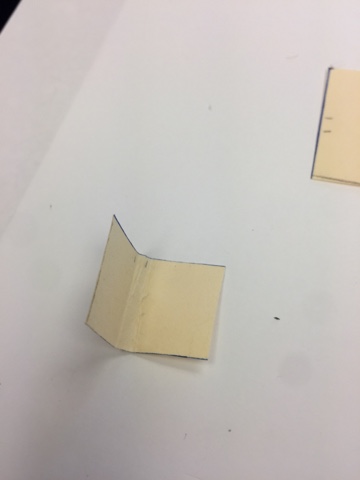
I knew the rough size of a book to be about 3/4 of an inch so I cut a long strip of 3/4 inch wide cars stock.


I then cut the long strip into the width of the cover of the book.  Honestly I eyeballed it....but it is about 1.5 inches.  (And further down the assembly line I used a previous cut book cover as my template). I also marked the rough spots to fold the cover.


I colored the cover.  Since my house is set in the 1900's I didn't want fancy pictures....


I then folded the cover into a book shape.


I took the white paper and cut it in long strips (the width of a piece of paper) in 3/4 inch strips.


This strip of white paper I folded into an accordion shape.   Once again I eyeballed it and checked to make sure it would fit into the cover of the book I was working without overlapping.   I trimmed the top and bottom of the 'accordion' to make it nice and neat.


I then glued the inside binding of the cover and attached one of the 'accordion' pieces of paper. I held this with my fingers for a few seconds.


My first few attempts I wrote with a find pen the name of the book...and while it was cute I didn't like it.  


I decided to print up the names....so at this point I then took my printed list and cut one title out.


  I colored it the same color as the cover and glued it to the outside of the binding. Center and hold for a few seconds to make sure it adheres.


Set to dry and begin the next book!!!


Notes:


I chose titles that were historically  accurate.


The chairs will be reupholstered soon


The wallpaper is destined to go bye bye soon too!!

Thursday, December 15, 2016

A New Name


So I was calling the house that my boyfriend and his family passed along to me the 'little blue house'.   But one day shortly after I wrote the last post I decided to name it the (Insert his last name) Mini Mansion.  S.M.M  or simply  The Mini Mansion.   Is this really anywhere near a mansion?  NO!   But that is what makes it even more fun!   And besides, who wants to call it a little blue house?  What if I repaint it a different color other than blue? Theoretically in a few years I could be calling a white house the 'little blue house'.  That would be ridiculous!  So it has been dubbed a new name!

So much has happened, with the Mini Mansion in terms of planning, thoughts and ideas!  And yes, the work has just recently commenced.

When I wrote last I was contemplating a bathroom.  I really loved the idea of a closed off room with an open door looking into a 'hint' of a bathroom.  I thought of different ways to accomplish it, but then......

I threw a cook stove into the kitchen and a cabinet.   I loved it! 


 I knew it would need a little table under the window and when I found a more 'farm like' table I quickly swapped out the smaller table from the log cabin.  The original log cabin table works PERFECTLY (sorry no picture).  I am toying with doing a wainscoting in the kitchen.  The cabinet, stove and table really take up the whole room so I knew that this was going to be a primitive kitchen. (No running water sink as there just wasn't room!)  I was ok with this. 

I settled on 'turn of the century' for this house.  Right around 1900!

The primitive kitchen threw me for a loop though.  You see, I don't mind having a house that isn't exactly historically accurate but having a 20-40's bathroom with running water but no running water in the kitchen bothered me too much.  So I nixed the idea for the bathroom and started to contemplate the upstairs rooms?   A bedroom and a nursery?  Yes that is what I was leaning toward.  

And then I threw some furniture in the living room.  


The picture is old, I believe I am going to turn the steps around the other way...and the chair and sideboard closest to the back are going to be swapped with each other.  Minor changes.  But the room really can't hold much more than those three pieces of furniture (And yes, they will be 'reupholstered' because that pattern is so not working!)   So how would I have an extra bedroom and person living there when there wasn't room?  (the kitchen table really only has room for two of the chairs...so it's small all around)   Well shucks!  Back do the drawing board.

A few days later......Ahhhhhh a sewing room for the lady of the house!   Fabulous!   I have nothing for it!  In fact, I can make this the house of a spinster or widow!  WOO HOO

I looked at color schemes for the outside and settled upon this color scheme


I actually have picked up some really cool features (paper for the walls in two rooms, a tea set, etc) for the Mini Mansion.   I can't wait! 

The 1900's timeframe only presented one difficulty.  I wanted to dabble in electricity in the Mini Mansion.  Why  not?  What better time than now to experiment, and something small would be perfect!  But seriously, 1900's would be a bit early for electricity.   I started scanning lights and saw that I could buy 'powered' oil lamps and lanterns.  Great!  I was back on track.  The plans were made!   I just needed to get the wiring kit and get started.   I asked for it for my birthday!

My parents lived up to the birthday expectations and I got the wiring kit.  I chose the tape wire as the option that I wanted to attempt.  Last night I went to work on the electricity.

I ran my first few inches of tape and hooked in the junction box and transformer.  After a bit of figuring things out I got the test probe to light up!  I was in business!  I ran my whole line of uncut/un-spliced tape throughout the house.  There were no splices so I didn't test it until the end.   There was NO POWER!   ARRRGGGHHH  There was no power anywhere.  Not even where I had first tested it!  I fiddled.  I moved things.  I became frustrated.

I stepped back and with the help of some Ben and Jerry's Ice cream calmed down.  I went to bed.  And in the middle of the night I had an epiphany.   There was a screw on the junction box....if that screw had popped into one of those copper conductors in the tape, it could be messing me up.

I woke up in the morning and checked...the screw had definitely pierced the tape in a bad location.  I fixed that and pulled out the test probe.  Sadly, it still didn't work.  But I was undaunted.  I had one other idea. 

The Mini Mansion has very thin walls.  The prongs/probes go almost the whole way through the wall.  I checked the opposing side of the junction box.  Sure enough, the prongs were piercing that piece of tape.  In essence I was short circuiting my electricity!  I added a bend on the outside of the house so that the junction box would be somewhere else and ran my test probe.    

VICTORY!   I checked and I had electricity the whole way to the end of my laid tape!


 I will be  making a splice and running another line of tape off of the first line!  

 I have the lights picked out, I just need to buy them!  But that will come.  I have to completely run the electricity lines first...then attaché wall paper, wainscoting,  siding, paint and position those steps (and put up the new rails on the steps!).  I have some time and quite a bit of work to do before I need those lights!

Meanwhile, the log cabin still does not have a bed finished........

AND the big news?  For my birthday my boyfriend bought my the Greenleaf McKinley!!!!!


Wednesday, November 30, 2016

The Little Blue House


My boyfriend has been very patient with my growing obsession for dollhouses.  He has wandered through dollhouse stores and scanned the shelves of dollhouse bits and pieces like a good sport.  He has asked for progress reports on the Log Cabin and has listened to me babble on about my ideas, thoughts and plans.  So when he was helping his parents clean out a basement in preparation for a move he thought of me when they came across an old dollhouse that belonged to his sister.  He checked with her about her continued ownership of the house.  She was not interested so ownership was transferred to me.  
I know next to nothing about the house other than the fact that it was put together by my boyfriend's parents as a Christmas present for his sister.   The house is an estimated 25 years old.

I stared into the house and started to dream.....   

My first thought was to do a kitchen in the room with the steps and a living room in the adjoining downstairs room.  But then I started thinking that an eat in kitchen would probably take a bit more room so maybe I should switch.  I went back and forth, listing the pros and cons for each option in my head.

I immediately began to ponder where to put a bathroom.  Within no time at all, I came upon the idea to put in a wall in the upstairs room where the steps come up.  I would have a little sitting area in the open area and I would have an open door with a glimpse into a bathroom in the closed off section. That would leave me a nice sized bedroom in the room with the dormer.   I was actually happy with my plans for the upstairs.

I couldn't wait to tear into my project.  I knew that the steps had to be carefully pulled out and some wall paper stripped as the first steps for the inside.  So I began to work on that tonight.

The steps came out very easily!


That room looked so much bigger and more manageable without the steps!  And then I started to play around a bit.  And another idea began to form.  What if I turned the steps around and put it into the long room on the right?

That really didn't kill too much of that room.  But if I do that it totally affects my plans for the upstairs.   Well, maybe not totally.  I could still partition off that room on the left and do a 'hint of a' bathroom and a sitting/sewing/kids room in the other portion.   Of course, I have a cookstove that i am itching to use somewhere.  I could do another house with no bathroom and get more chamber pots.

Meanwhile, I have to finish up the log cabin so I can work on the little blue house with a free and clear mindset. (Although will any dollhouse ever really be totally done?)

Tuesday, October 18, 2016

Baskets

Other than then bed which needs quite a bit more work I am working on little things in the dollhouse.   I am filling the attic with stored goods and little touches that bring it to life!

Today I decided to take a roll of craft paper and make baskets.


I only needed craft paper, scissors, glue small wooden circles and I added some embroidery floss on occasion to add color.


First I cut a strip of craft paper big enough to go around the wooden circle..with a bit of overlap.  The height is whatever you want!  I made taller ones and shorter ones.  

I then cut it into the 'comb'. The first few I actually drew the comb in the paper first.


 But after the first few baskets I honestly eyeballed my cuts trying to keep them uniform and as small as possible.


Then I cut strips of the craft paper ...once again as thin as I could....however I did use a ruler for these!  Even and straight is important here!   The strips need to be just a bit longer than the 'comb'.

The 'comb' is the base of the basket and what I weaved all the strips through.

Take one strip of paper and weave it in and out and push it to the bottom of the comb.  It works best to dab a bit of glue on the paper to hold the paper on each end.   I also found that with working with the smaller baskets and on the top row of any basket's weave that if I glue ever other weave...just a tiny smear of glue ....it worked much better!     

Weave strips in until you reach the top. 

When the weaving is done take another strip and overlay it over the top edge....


Take a wooden circle base (or heavy Matte board or card stock paper) ...Place glue on the edge of the circle and glue the bottom inside of the basket weave to the circle....so that the circle is the base.

At that point you can be done if you want.  

If you want a handle grab another strip and glue one end inside the basket...and glue the other side on the inside of the opposite side of the basket....it is again totally subjective to style and preference as to how long the handle is!


I started to get fancy.  On one or two baskets I glued a strip of colored embroidery floss around the top and bottom edges of the basket.

I also weaved some embroidery floss into the basket between strips of paper weave.


I decided that such a basket would have handled to match so I braided some embroidery floss together.... (I used the same color as the accent weave)


I did that twice...then I made little loops from the braids and glued two loops to the inside of the basket.


So many variables...each one is different and has its own personality!!!


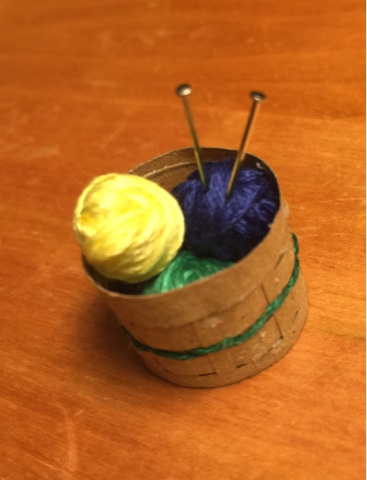
Now I just need to figure out what to put in my baskets!!!  Eggs?  'Yarn' and needles?  Laundry???

First up...yarn and 'knitting needles'. 


 What does the bed need???  It needs stained, roped, mattresses created , pillows and quilts for both the main bed and the trundle bed

Thursday, September 15, 2016

Log Cabin: Getting close now!!

I have been working on and off on the log cabin dollhouse.  It has been a headache in some ways because this house was definitely NOT made to any scale!!!!  So nothing fits perfectly!   But that same non-scale dilemma has allowed me the freedom to fudge quite a few things!!  So a mixed blessing!

I have made the rope bed and matching trundle bed.    It needs sanded and stained/painted.  I am also currently working on the warm and toasty quilts for the bed.   The quilts are slow going as I have been cross stitching them.  Of course I started with quilt for the biggest bed...it is sloooow going!  Hopefully the trundle bed and cradle quilts will be quick to complete!!!  
Yes the fabric will soften up after washed.  

I have also recently decided that I need a work table in the kitchen...mostly because I found a cute rolling pin that I am dying to use!    

Other than those 'big projects'. The log cabin is mostly done....just little small touches to make it look totally livable!

What touches?    

**A mouse and a mouse trap (I had been looking and just found one at an antique store this week!!)
** a chamber pot 
** wash basin and pitcher (oh I guess that means I need a stand for that too.
** a few kitchen things for the work table 
** lanterns, lamps and candles 
** I need to weather the wash board!!!


This dollhouse isn't even done and I've started buying pieces for my next dollhouse AND for a room that I want to do!!!  Plus I have visions of a shop or two that I want to do!

What dollhouse next??? 1940's-1950's era.  I found awesome vintage kitchen appliances at a fair recently!!

What room???  A Christmas scene from the turn of the century...but a well to do house..not a log cabin!!!  I have the furniture I just need to reupholster!  

What shops?    A quilting/fabric store and a quilt shop selling quilts!  I have nothing...yet.  

Oh yeah this is addictive!!!!